Helm is like a package manager for Kubernetes. Helm charts help define, install and upgrade your Kubernetes applications.
In this guide you'll learn how to set up New Relic with the official New Relic Helm charts. The Helm charts will deploy everything you need to get full observability of your Kubernetes environment.
Before you begin
This walk through assumes you’ve already deployed a Kubernetes cluster. Or you can simply use our test environment, by following the interactive tutorial at the bottom of this page.
To use this guide, you should have some basic knowledge of both New Relic and Kubernetes. To complete the full exercise, you’ll need to:
Adding the New Relic Helm repository
First, add the official New Relic Helm repository
$helm repo add newrelic https://helm-charts.newrelic.comYou should see something similar to the following:
"newrelic" has been added to your repositoriesInstall the New Relic Helm chart
Follow the instructions to get your New Relic license key
Replace YOUR_NEW_RELIC_LICENSE_KEY and CLUSTER_NAME before running the following command:
$helm install newrelic-bundle newrelic/nri-bundle \> --set global.licenseKey=YOUR_NEW_RELIC_LICENSE_KEY \> --set global.cluster=CLUSTER_NAME \> --namespace=default \> --set newrelic-infrastructure.privileged=true \> --set ksm.enabled=true \> --set prometheus.enabled=true \> --set kubeEvents.enabled=true \> --set logging.enabled=trueYou should see something similar to the following:
NAME: newrelic-bundleLAST DEPLOYED: Wed Aug 19 09:04:52 2020NAMESPACE: defaultSTATUS: deployedREVISION: 1TEST SUITE: NoneCheck if the New Relic agents have been deployed:
$kubectl get daemonsets,podsThis should look similar to:
NAME DESIRED CURRENT READY UP-TO-DATE AVAILABLE NODE SELECTOR AGEdaemonset.apps/newrelic-bundle-newrelic-infrastructure 1 1 1 1 1 <none> 2m53sdaemonset.apps/newrelic-bundle-newrelic-logging 1 1 1 1 1 <none> 2m53sNAME READY STATUS RESTARTS AGEpod/newrelic-bundle-kube-state-metrics-69ff8cfb74-rgjc5 1/1 Running 0 2m53spod/newrelic-bundle-newrelic-infrastructure-z8ddb 1/1 Running 0 2m53spod/newrelic-bundle-newrelic-logging-wp22p 1/1 Running 0 2m53spod/newrelic-bundle-nri-kube-events-f9d5bb944-kcxxf 2/2 Running 0 2m53spod/newrelic-bundle-nri-metadata-injection-66d76c868b-xrcq8 1/1 Running 0 2m53spod/newrelic-bundle-nri-metadata-injection-job-rszw5 0/1 Completed 0 2m53spod/newrelic-bundle-nri-prometheus-569689b7cb-pnddg 1/1 Running 0 2m53sUse the New Relic Kubernetes cluster explorer
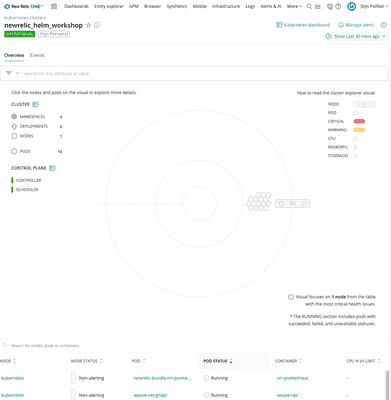
Open the Kubernetes cluster explorer in New Relic
You should see something like:

Want to know more? Learn how to navigate the Kubernetes cluster explorer
Try it out now
We can have a Kubernetes test cluster ready for you in a few minutes. By following this on-line tutorial, you will learn how to deploy the New Relic Helm charts.
Some tips to use the on-line tutorial window:
- Accept the cookies, so you can see the menu bar.
- Click anywhere in the tutorial window to start. It will take a few minutes for your environment to be ready.
- Press CTRL-l or type
clearto clear the terminal window - Click on the finish flag icon in the bottom menu to hide or show the instructions
Good luck!
Important
Some browsers automatically disable the use of iframes. If the module isn't loading please check your browser settings.
What’s next?
Nice work — now you can easily deploy New Relic with the official New Relic Helm charts and you can start using the Kubernetes cluster explorer. The Kubernetes cluster explorer brings full observability to your k8s environment, so you can troubleshoot faster by correlating logs, metrics, events and traces all within the same user experience.